
In this article, I will cover basic work with MapView (and MapFragment) markers, learn how to implement marker clustering, i.e. group markers located close to each other, and display dynamic icons in the markers, i.e. load by url and display remote images. Ultimately, we will create such map with clusters and dynamic image loading (in background).
Basic markers loading and displaying
Create a new project in Android Studio and add an Activity with Maps Activitytemplate.
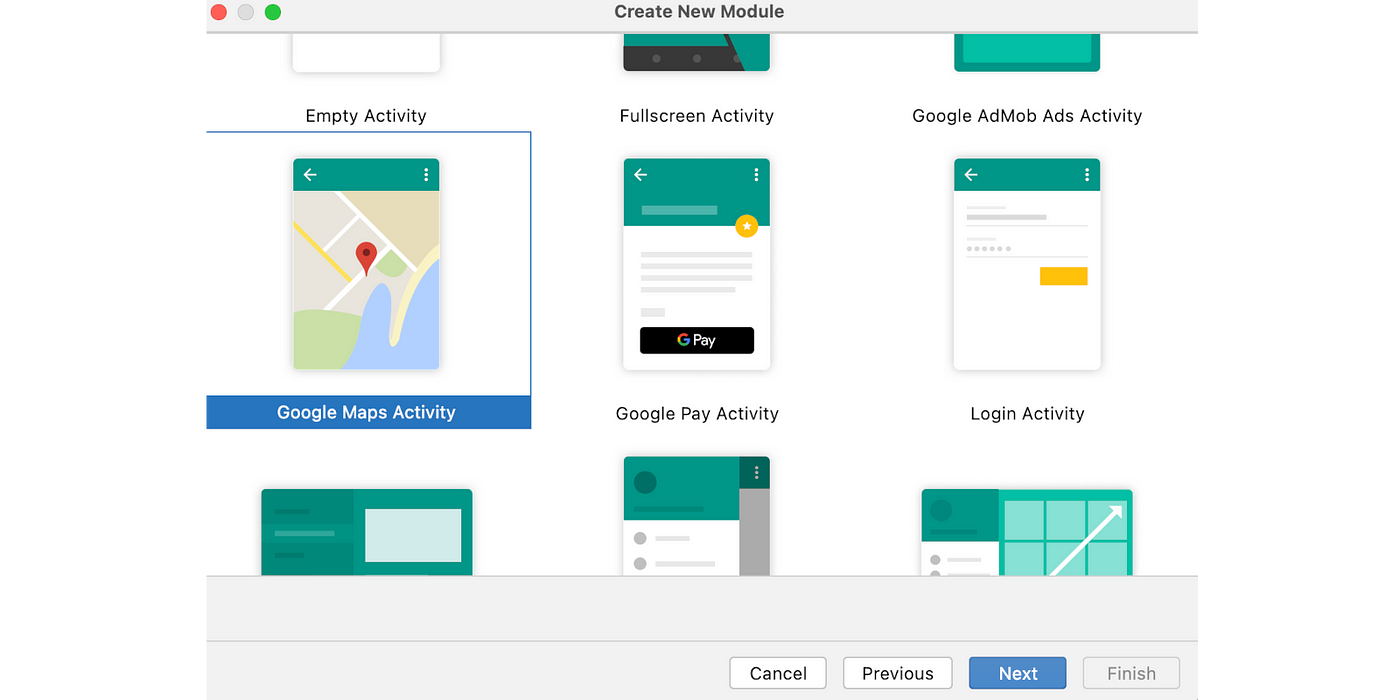
In the newly created project, open AndroidManifest.xml. There, you will see a comment requesting to get an API_KEY by the link and add it to the metadata.
<meta-data
    android:name="com.google.android.geo.API_KEY"
    android:value="YOUR_API_KEY" />
If everything is correct, you will be able to launch the app and see a map with a marker somewhere in Australia. This is a very basic app and in case of any problems, please refer to the documentation or StackOverflow.

Next, add dynamic marker upload. In our example, we will use a JSON file with the marker locations and download them using Retrofit.
[
  {
    "lat": 59.92140394439577,
    "lon": 30.445576954709395,
    "icon": "1619152.jpg"
  },
  {
    "lat": 59.93547541514004,
    "lon": 30.21481515274267,
    "icon": "1712315710.jpg"
  },
Now we are interested only in location but we will use the icon field in the next sections of this article.
Add MapApplication class to our app. It will be responsible for data loading in the app. Of course in the real app we would use a separate class and modules for such business logic and follow the Clean Architecture principles but this is not the focus of this article.
class MapApplication : Application() {

    private val context = CoroutineScope(Dispatchers.Default)

    private val _dataFlow = MutableSharedFlow<List<MarkerData>>(
        replay = 1,
        onBufferOverflow = BufferOverflow.DROP_OLDEST
    )

    val dataFlow: Flow<List<MarkerData>> = _dataFlow

    override fun onCreate() {
        super.onCreate()

        val retrofit = Retrofit.Builder()
            .baseUrl(BuildConfig.BASE_URL)
            .addConverterFactory(GsonConverterFactory.create())
            .build()

        val service = retrofit.create(MarkerLocationsService::class.java)


        context.launch {
            _dataFlow.tryEmit(service.getLocations())
        }
    }
}
MarkerLocationsService is a Retrofit service that downloads our markers.
Update onMapReady code in MapActivity so that it gets this list:
override fun onMapReady(googleMap: GoogleMap) {
    mMap = googleMap

    scope.launch {
        (application as MapApplication).dataFlow.collect { data ->
            mMap.clear()
            data.forEach { marker ->
                mMap.addMarker(MarkerOptions().position(LatLng(marker.lat, marker.lon)))
            }
        }
    }
}
Great! Now we know how to display markers received from the server. But there may be a lot of markers, so let’s add the option of adding markers to the map taking into account the region which is currently displayed. For this, we need OnCameraIdleListener that shows that the user has interacted with the map (changed the scale or moved to another location), which means that we need to recalculate map boundaries and display markers for it only.
internal class BoundariesListener(
    private val map: GoogleMap,
) : GoogleMap.OnCameraIdleListener {

    private val _boundariesFlow = MutableSharedFlow<LatLngBounds>(
        replay = 1,
        onBufferOverflow = BufferOverflow.DROP_OLDEST,
    )
    val boundariesFlow: Flow<LatLngBounds> = _boundariesFlow

    override fun onCameraIdle() {
        val boundaries = map.projection.visibleRegion.latLngBounds
        _boundariesFlow.tryEmit(boundaries)
    }
}
Now, we can assign BoundariesListener to the map object, and, when the map boundaries gets changed, we will filter the markers taking into account currently shown area:
override fun onMapReady(googleMap: GoogleMap) {
    mMap = googleMap

    val boundariesListener = BoundariesListener(googleMap)

    mMap.setOnCameraMoveStartedListener(boundariesListener)
    mMap.setOnCameraIdleListener(boundariesListener)

    scope.launch {
        (application as MapApplication).dataFlow.combine(boundariesListener.boundariesFlow) { data, boundaries ->
            data to boundaries
        }.collect { (data, boundaries) ->
            mMap.clear()

            data.filter { boundaries.bounds.includesLocation(it.lat, it.lon) }
                .forEach { marker ->
                    mMap.addMarker(MarkerOptions().position(LatLng(marker.lat, marker.lon)))
                }
        }
    }
}

fun LatLngBounds.includesLocation(lat: Double, lon: Double): Boolean {
    return this.northeast.latitude > lat && this.southwest.latitude < lat &&
            this.northeast.longitude > lon && this.southwest.longitude < lon

}
Excellent! After this step, we can display markers received from the server, on the map; however, if there are many items positioned close to each other, the markers will overlap, so let’s see how we can group them.
Marker clustering
The screenshot above shows a large number of markers that can overlap and, in a larger scale, merge into a single point. That’s why Google created a library that can group markers if they are close to each other. In this case, instead of several markers, we display one with general information. Let’s try to implement this solution in our app.
To add the clustering feature, add a dependency on Maps SDK for Android Utility to the project.
dependencies {

  ...

    implementation 'com.google.maps.android:android-maps-utils:<version>'
}
First, we need ClusterManager that will get big part of the job done. It processes a list of the markers, decides which of them are close to each other and, therefore, should be replaced with one group marker (cluster). The second important component is ClusterRenderer that, as it goes from its name, draws markers and cluster items. Also, we have a base class DefaultClusterRenderer that implements quite a lot of the basic logic, so we can inherit from it and care only about important things. Both these classes work with ClusterItem which stores the marker information such as location. It is an interface, so let’s, first of all, create its implementation:
data class MapMarker(
    val titleText: String,
    val location: LatLng,
) : ClusterItem {

    override fun getPosition(): LatLng = location

    override fun getTitle(): String? = null

    override fun getSnippet(): String? = null
}
It’s plain and simple: we store information about the location and some marker label. It actually can contain more information about the marker, but we will look at it later. Then, create an instance of ClusterManager in onMapReady:
override fun onMapReady(googleMap: GoogleMap) {
    mMap = googleMap

    val boundariesListener = BoundariesListener(googleMap)

    val clusterManager = ClusterManager<MapMarker>(this, mMap)
    val mapRenderer = MapMarkersRenderer(
        context = this,
        callback = this,
        map = mMap,
        clusterManager = clusterManager
    )
    clusterManager.renderer = mapRenderer
Here, you can see MapMarkersRenderer is used, so add it to the project, too:
class MapMarkersRenderer(
    context: Context,
    map: GoogleMap,
    clusterManager: ClusterManager<MapMarker>,
) : DefaultClusterRenderer<MapMarker>(context, map, clusterManager) {

    private val mapMarkerView: MapMarkerView = MapMarkerView(context)
    private val markerIconGenerator = IconGenerator(context)

    init {
        markerIconGenerator.setBackground(null)
        markerIconGenerator.setContentView(mapMarkerView)
    }

    override fun onBeforeClusterItemRendered(clusterItem: MapMarker, markerOptions: MarkerOptions) {
        val data = getItemIcon(clusterItem)
        markerOptions
            .icon(data.bitmapDescriptor)
            .anchor(data.anchorU, data.anchorV)
    }

    override fun onClusterItemUpdated(clusterItem: MapMarker, marker: Marker) {
        val data = getItemIcon(clusterItem)
        marker.setIcon(data.bitmapDescriptor)
        marker.setAnchor(data.anchorU, data.anchorV)
    }

    override fun onBeforeClusterRendered(
        cluster: Cluster<MapMarker>,
        markerOptions: MarkerOptions
    ) {
        val data = getClusterIcon(cluster)
        markerOptions
            .icon(data.bitmapDescriptor)
            .anchor(data.anchorU, data.anchorV)
    }

    override fun onClusterUpdated(cluster: Cluster<MapMarker>, marker: Marker) {
        val data = getClusterIcon(cluster)
        marker.setIcon(data.bitmapDescriptor)
        marker.setAnchor(data.anchorU, data.anchorV)
    }

    override fun shouldRenderAsCluster(cluster: Cluster<MapMarker>): Boolean = cluster.size > 1
}
In this code snippet we have two pairs of methods onBefore…Rendered and on...Updated. They are called when a cluster or cluster item (separate marker) is created or updated (when the marker already exists on the map and we just want to update it’s presentation, for example color, text or something else). Also, we have a method shouldRenderAsCluster, where we define whether we need to display a group of markers as a cluster or as separate markers. In the code above, we want to show the cluster instead of separate markers if the group contains more than one element.
ClusterRenderer makes it possible to draw very custom clusters and markers so we will use this option and create a custom view MapMarkerView and draw it in methods getClusterIcon() and getItemIcon(). I’m not going to provide code for MapMarkerView since it’s a quite simple android View that shows image and text only. But you can check it out in my project on Github. What we need is to send some content to this View and then draw its state, receive bitmap with markerIconGenerator.makeIcon and send it to marker.setIcon, so methods getClusterIcon and getItemIcon will look like this:
private fun getItemIcon(marker: MapMarker): IconData {
    mapMarkerView.setContent(
        circle = MapMarkerView.CircleContent.Marker,
        title = marker.titleText
    )
    val icon: Bitmap = markerIconGenerator.makeIcon()
    val middleBalloon = dpToPx(mapMarkerView.context, 24)
    return IconData(
        bitmapDescriptor = BitmapDescriptorFactory.fromBitmap(icon),
        anchorU = middleBalloon / 2 / icon.width,
        anchorV = 1f
    )
}

private fun getClusterIcon(cluster: Cluster<MapMarker>): IconData {
    mapMarkerView.setContent(
        circle = MapMarkerView.CircleContent.Cluster(
            count = cluster.size
        ),
        title = null
    )

    val icon: Bitmap = markerIconGenerator.makeIcon()
    val middleBalloon = dpToPx(context, 40)
    return IconData(
        bitmapDescriptor = BitmapDescriptorFactory.fromBitmap(icon),
        anchorU = middleBalloon / 2 / icon.width,
        anchorV = 1f
    )
}
Now, we can render clusters and markers. The last thing to do is to send the list of markers directly to the ClusterManager so that it determined which of them and in which way to display. Please note that it is crucial to call clusterManager.cluster() after you modified the collection of items.
override fun onMapReady(googleMap: GoogleMap) {

  ...
    scope.launch {
        (application as MapApplication).dataFlow.combine(boundariesListener.boundariesFlow) { data, boundaries ->
            data to boundaries
        }.collect { (data, boundaries) ->

            val markers = data.filter { boundaries.bounds.includesLocation(it.lat, it.lon) }
                .map { marker ->
                    MapMarker(
                        titleText = "Item ${marker.hashCode()}",
                        location = LatLng(marker.lat, marker.lon)
                    )
                }
            clusterManager.clearItems()
            clusterManager.addItems(markers)
      clusterManager.cluster()
        }
    }
}
If we now launch our app, we will see the map with clusters and markers. They are displayed according to the logic that we added to MapMarkerView and MapMarkersRenderer, i.e. it can display static icons (the purple little human) and text only.

Next, we are going to learn how to upload dynamic images stored remotely on the server and how to render them in markers.
Dynamic images in the markers
If you open Google Maps app, you will see that 99% of the icons are static resources matching the category of a place: restaurant, hotel, museum, etc. Google Maps can also display icons of selected locations but their number relatively to the other icons is very low.
I believe this restriction aims two objectives. The first one is to ensure optimal performance. Obviously, image loading from the Internet requires additional resources for the download and drawing, as compared to static icons. The second reason is to avoid visual littering of markers in the map since multiple different icons create visual mess and make objects under the layer of markers less distinct.
Unfortunately, Maps SDK for Android Utility Library doesn’t support loading and showing dynamic images out of the box. Normally we load images in the background thread, and loaded result will be passed in a callback and placed into ImageView in the main thread (i.e. in Picasso).
Picasso.get()
    .load(imageUrl)
    .resize(size, size)
    .centerCrop()
    .into(object : Target {

    })
In theory, we could load images in methods onBefore…Rendered and on...Updated, but they are synchronous, i.e. the drawing must occur directly in them and block the UI thread.
However, we can overcome this by first rendering a placeholder and starting the download of the image simultaneously. And once it is loaded, update the markers with the loaded and cached image. Here is a diagram for this:

We will use Picasso library for the image upload. For this, add it to the project:
dependencies {

    implementation 'com.squareup.picasso:picasso:<VERSION>'
Now, update MapMarkersRenderer, adding it the ability of loading the icon. We want to display images in separate markers only, so update only method getItemIcon, used in onClusterItemUpdated and onBeforeClusterItemRendered
private fun getItemIcon(marker: MapMarker): IconData {
    val iconToShow: MapMarker.Icon = when (marker.icon) {
        is MapMarker.Icon.UrlIcon -> {
            val cachedIcon = loadedImages.get(marker.icon.url)

            if (cachedIcon == null) {
                loadBitmapImage(marker.icon.url)
            }
            cachedIcon?.let { MapMarker.Icon.BitmapIcon(marker.icon.url, it) } ?: marker.icon
        }

        else -> marker.icon
    }
Here loadedImages is a cache of previously loaded icons. LruCache will be an excellent choice for this.
private val loadedImages = LruCache<String, Bitmap>(30)Next, add a container for our icons so that they could be stored in MapMarkerand drawn in a MapMarkerView.
data class MapMarker(
    val icon: Icon,
    val titleText: String,
    @ColorInt val pinColor: Int,
    val location: LatLng,
) : ClusterItem {

  ...

    sealed interface Icon {
      val url: String
      data class Placeholder(override val url: String) : Icon
      data class BitmapIcon(override val url: String, val image: Bitmap) : Icon
    }
}
Let’s now also update the MapMarkerView code for it be able to draw our icons:
fun setContent(
    circle: CircleContent,
    title: String?,
    @ColorInt pinColor: Int,
) {

    when (circle) {
        is CircleContent.Cluster -> {
     ...
        }

        is CircleContent.Marker -> {
            binding.mapMarkerViewClusterText.isVisible = false
            val icon = circle.mapMarkerIcon
            val drawable = getIconDrawable(markerIcon = icon)
            binding.mapMarkerViewIcon.setImageDrawable(drawable)

      ...
private fun getIconDrawable(
markerIcon: MapMarker.Icon,
): Drawable? {
val drawable = when (markerIcon) {
is MapMarker.Icon.BitmapIcon -> {
RoundedBitmapDrawableFactory.create(resources, markerIcon.image).apply {
isCircular = true
cornerRadius = max(markerIcon.image.width, markerIcon.image.height) / 2.0f
}
}
is MapMarker.Icon.Placeholder -> {
// Here we are just waiting for image to be loaded
null
}
}
return drawable
}Back to MapMarkersRenderer we need to define method loadBitmapImage. We pass the image ID to it and download the image using Picasso. The result will be received in ImageTarget . Here, we cache the image and return in the Callback to later update ClusterManager with our uploaded image.
private fun loadBitmapImage(imageUrl: String) {
    val size = dpToPx(context, 40).toInt()
    val target = IconTarget(imageUrl)

    Picasso.get()
        .load(BuildConfig.IMAGES_URL + imageUrl)
        .resize(size, size)
        .centerCrop()
        .into(target)
}

inner class IconTarget(private val imageUrl: String) : Target {
    override fun onBitmapLoaded(bitmap: Bitmap, from: Picasso.LoadedFrom) {
        loadedImages.put(imageUrl, bitmap)
        callback.onImageLoaded(icon = MapMarker.Icon.BitmapIcon(imageUrl, bitmap))
    }

    override fun onBitmapFailed(e: Exception?, errorDrawable: Drawable?) {}

    override fun onPrepareLoad(placeHolderDrawable: Drawable?) {}
}

interface Callback {
    fun onImageLoaded(icon: MapMarker.Icon.BitmapIcon)
}
In this code snipper, for simplicity we don’t handle any errors in onBitmapFailed and don’t check if an image with such URL is already downloaded (we have it in our cache), but I recommend adding such a check. You can find an example of such code here. Next, when we call callback.onImageLoaded, we assume that our activity will handle this event, find the marker to be updated, and tell ClusterManager to update it on the map. After that, ClusterManager will see that the image just uploaded already exists in the cache and, therefore, can be sent to MapMarkerView, and the view can be rendered with the image inside. If everything is correct, we will have the map with clusters and markers that can display the images uploaded asynchronously, when we launch the app.

You can find the full code of this app on my Github. I’ve added certain optimizations that can be of use when you implement such feature in a real-world project. In addition, I would recommend to use a custom style for your map. This will help to remove some elements displayed on the map by default, such as businesses (restaurants, hotels, etc.), to focus user’s attention on the markers and clusters.
