Command Line applications are those applications that use terminal as an interface to interact with the user. Ever since their development, they have been pretty simple and mundane. This is what a windows command prompt looks like:

Terminals in Windows, MacOS, or Linux, look the same i.e., black and white. But now, we can make even the most basic User Interface interesting, colorful, and interactive.
Adding color to your terminal output can make you Command Line Interface more engaging, informative, and easy to understand. This feature is provided in Rust with the help of the `colored` crate. In this article, we'll explore how to use this crate to bring vibrant hues to your CLI projects.
To utilize the features of the `colored` crate, specify its version for the compiler. This can be done by adding the following line to your `Cargo.toml` file.
[dependencies]
colored = "2"
Next, import the necessary parts of the `colored` crate into your main file.
use colored::*;
Now that we have the tools, let's make our art.
In a terminal, there are two sections to an output string: the background and the foreground. We can change the colors of either using the trait `Colorize'.
1. Foreground
The foreground is the output text that will be displayed on the terminal. `colored` crate provides us functions that help us color and stylize the output text. Let's learn how to color and stylize the output string:
a. Color a String:
Let's create a colorful string using our tools. This string isn't a regular string, but a special `ColoredString` with added color and style.
Syntax
let <variable> = "<string>".<color/style>();
We can initialize a `ColoredString` type in the following ways:
let green_word = "Hello".green();
let blue_word = String::from("World").blue();
Now let's look at an example on how we can implement what we have learned:
Code:
// Write a function that takes two parameters - a and b - and returns which one is larger
// if a is larger, return your message in green
// if b is larger, return your message in red
use colored::*;

fn main() {
  println!("{}", compare_numbers(5, 3));
  println!("{}", compare_numbers(2, 7));
}

compare_numbers(a: i32, b: i32) -> ColoredString {
  if a > b {
    format!("a is larger: {}.", a).green()
  } else {
    format!("b is larger: {}.", b).red()
  }
}
This is what the output looks like:

Colored has many built-in colors from which you can choose:
black
red
green
yellow
blue
magenta
cyan
white
Colored also supports truecolors where you can specify any arbitrary RGB value.
Syntax:
let colored_string = "<stirng>".truecolor(<red_val>, <green_val>, <blue_val>);
Let's look at its implementation:
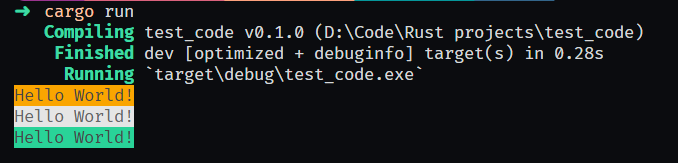
use colored::*;

fn main() {
  println!("{}", "Hello World!".truecolor(254, 47, 12));
  println!("{}", "Hello World!".truecolor(47, 12, 254));
  println!("{}", "Hello World!".truecolor(12, 254, 47));
}
This is what the output looks like:

b. Stylize a String:
We can italicize, bolden, or underline a `ColoredString` using functions provided by the `colored` crate.
Syntax:
let stylized_string = "<string>".<style>();
Code:
use colored::*;

fn main() {
  let name = "Bruce Wayne";
  println!("Hello, my name is {}.", name.italic()); // in italic
  println!("Hello, my name is {}.", name.bold()); // in bold
  println!("Hello, my name is {}.", name.underline()); // underlined
}
The output looks like this:

Now, let's look at what we can do on the background.
2. Background
We use the same syntax we used for the foreground, except we prepend the color or truecolor with 'on_'.
Code:
use colored::*;

fn main() {
    let orange_bg = "Hello World!".on_truecolor(250, 165, 0);
    let white_bg = "Hello World!".on_white();
    let green_bg = String::from("Hello World!").on_green();

    println!("{}", orange_bg);
    println!("{}", white_bg);
    println!("{}", green_bg);
}
This is what the output looks like:
'colored` provides the following styles:
bold
underline
italic
dimmed
reversed
blink
hidden
strikethrough
You can clear color and style any time by using `normal()` or `clear()`.
Combines Styles
you can also chain methods to combine various styles
Code:
use colored::*;

fn main() {
    let exp1 = "The quick brown".red().bold().on_bright_cyan();
    let exp2 = "fox jumps over".magenta().italic().on_yellow();
    let exp3 = "the lazy dog.".blue().strikethrough().on_red();

    println!("{}", exp1);
    println!("{}", exp2);
    println!("{}", exp3);
}
This is what the code looks like:

Remember: Not all terminals support colors or styles. Test across different environments.
Conclusion:
With `colored`, you can easily control the appearance of your terminal output. Experiment with different colors, styles, and combinations to make your Rust programs stand out. Go forth and paint your terminal masterpiece.